Friday, January 30, 2009

sRGB vs aRGB (Adobe 1998) the battle for color space.


One of the question which comes to you through your path down photography lane would be color space. I will attempt to summarize and assist you in the decision making process. For the inquiring minds the reference links provided below should point you into the right direction to further your quest for knowledge. Now that we got that aside lets get down to business.

What is the difference between sRGB and aRGB?

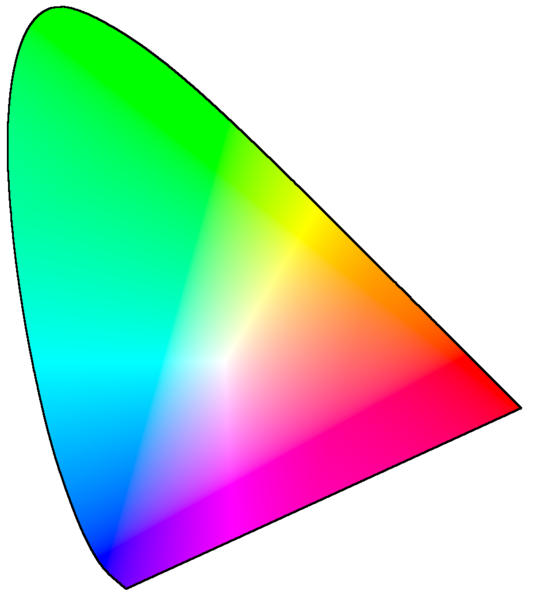
The difference is in the gamut. Think of it this way sRGB contains less gamut information with regards to color while aRGB contains more gamut information.

So what does gamut have to do with me?

Having more or less of gamut would impact you only when your images are converted from RGB to CMYK for printing. During the conversion process the more gamut information you have the more accurate your colors would be. If you are not sending your images for CMYK printing you do not need to worry about it.

But what if I dont print my images?

You can then stick to sRGB color space.

Okay so now I understand but what do you recommend?

RAW shooter - either color space settings on your camera would not matter much because RAW essentially preserve all the color your camera captures. You can then depending on what you want to use your image for convert the images to JPEG in either colorspace.

JPEG shooter - I am a big believer in having all the information I need before selecting what I dont need that is why I shoot RAW because at the end of the day you may not be fortunate enough to have a second chance. Having said that, we know aRGB contains the most gamut information so if you shoot JPEG use aRGB and during your workflow process save another copy as sRGB that way you never need to worry about the lack in gamut if you ever need to send your images for CMYK printing in the future.

About sRGB

sRGB is a standard RGB (Red Green Blue) color space created cooperatively by HP and Microsoft for use on monitors, printers, and the Internet. It is by far the most commonly used RGB color space, particularly in consumer grade digital cameras. However, given its nature, sRGB limited gamut leaves out many highly saturated colors that can be produced by printers or in film, and thus is not ideal for some high quality applications.

About Adobe RGB (aRGB)

Adobe RGB color space is an RGB color space developed by Adobe Systems in 1998. It was designed to encompass most of the colors achievable on CMYK color printers, but by using RGB primary colors on a device such as the computer display. The Adobe RGB color space encompasses roughly 50% of the visible colors specified by the Lab color space, improving upon the gamut of the sRGB color space primarily in cyan-greens.

Reference:
1. RGB Color Space
2. sRGB Color Space
3. Adobe RGB Color Space
4. Gamut
5. Color Theory
6. Aperture: Color and gamma settings for print and web

Thursday, January 29, 2009

Nikon D3 Professional Technical Guide


Stumbled upon this interesting guide when I was browsing some sites. Don't let the word technical guide scare you in fact I find this much better than the manuals which comes with the camera. The autofocus and exposure section is invaluable, the D700 and D300 users will stand to gain from this as well. To cut the long story short, both beginner and advance users will stand to gain from this document.

Download the manual here.

Monday, January 26, 2009

Happy Chinese New Year 2009


To all my family and friends I would like to wish you a Happy Chinese New Year 2009. May the year of the Ox brings health, happiness and wealth in abundance. Gong Xi Fa Chai!

Sunday, January 25, 2009

B+W Kasemann KSM CPL Filter


What is a polarizer for?
For Landscapes - Turn the sky really blue, makes the clouds pop and cuts down reflection especially from the water.
For Products with reflective surfaces - Cuts and remove reflections from the glass e.g. watches or even glasses.

I see circular and linear versions which should I get?
There has been a lot of questions on the Internet with regards to linear vs. circular polarizer and some of you may have stumbled upon this site seeking answers. Well to keep the long story short if you use a manual focus lens which does not support through the lens (TTL) metering then use the linear version its cheaper. If you use auto focus or TTL metering please use circular polarizer.

How do you use it?
Mount it on your lens like you would your UV filter, point it at your subject and turn it until it achieved your desired effect.

What is the difference between the slim and normal type?
With the slim type you can stack it on top of your existing UV filter without introducing significant vignetting around the edges that way you don't have to juggle between the two filters.

Which brand is good?
Depending on your brand preference and budget. Since you have invested heavily into good lenses the last thing you want is to invest in substandard filters which would impact your picture quality. So buy the best you can afford.

Can I see some sample pictures please?
Of course you can have a look at the images below from Mauritius. Taken with a Nikon D300 + Nikkor 17-55mm f/2.8 + Hoya Pro1D UV Filter + B+W Kasemann KSM CPL Filter.

Saturday, January 24, 2009

Sakae Sushi through the lens of Nikkor 35mm F/2D


After the short overview of this gem here, I promised to give it a test in the field and post some sample pictures. This lens was mounted the D3 with the latest firmware release 2.01 (If you have not upgraded you should the AF-C is FAST!). Please note that if you mount this on the DX body the crop factor would turn it into a 52.5mm lens.

Here are some sample images taken at Sakae Sushi Mutiara Damansara with the D3+35mm lens combination. As usual the food is excellent and the company was even better.


Exif

Summary:

1) Lens Size - its small so that is a plus point.
2) Field of View - I love it. I find the 50mm on a D3 a bit tight.
3) Focusing Speed - Its not as fast as the 50mm but its still fast.
4) Color - I am not complaining
5) Sharpness - Razor sharp images
6) Bokeh - You decide

Friday, January 23, 2009

Star Filter

Once in a while we envision our images to have a certain effect. No doubt, some of these effects can be easily replicated in Photoshop or any other image editing programs but not all effects can be replicated with the desired outcome.

One of such desired effects which is difficult to be replicated in Photoshop without looking entirely faked would be the star effect. I for example tend to prefer using a real star filter as oppose to "getting" that effect in Photoshop.


Since we are in Malaysia, we don't have a wide variety of filter selections so we have to take what comes by. Hoya is a reputable brand which makes good filters so... the choice is not that difficult. I chose the Pro1d Star 4 version because it can be rotated just like a CPL filter which enables us to change the stars. I purchase 2 of this:

1) 62mm thread size which can be used for the 60mm and the 105mm macro lens. This would be ideal for product and portraits.

2) 77mm thread size which can be used for the 24-70 and the 70-200. This is ideal for landscapes and portraits.

Now time for the picture to do the talking.

Focus Hunting: Understanding Autofocus points and your subject

Objective

Obtaining a correct focus can make a difference between a useable image and the ones that end up in the recycle bin. What becomes more frustrating is when you want to photograph a subject but the digital SLR Autofocus (AF) would not obtain a focus on that subject a.k.a “Focus Hunting”. This article was written to provide the reader with valuable insights on why it happens and how to workaround it. Although this article and its images make specific references to Nikon cameras and certain models, it is still suitable for everyone with a digital SLR.
Introduction

Autofocus (AF) is a very useful feature in today’s modern digital SLR. It enables us to have accurate focus on a subject in a fraction of a second. The majority of digital SLR AF systems relies heavily on the light and contrast within a scene to achieve fast and accurate focus.

But if you attempt to take a picture of a scene or objects (mirrors, blank walls), or subjects in dim conditions or when there is little contrast between the subject and the background there is a high possibility of focus hunting occurring or the AF fails to achieve focus entirely. Before we provide workarounds we must first understand what AF sensors are and what are the differences between cross and horizontal type.

AF sensors

Most modern digital SLR comes with a multitude of AF point sensors ranging from 9 to even 51 points. These AF point sensors are clearly visible within the viewfinder however; most users did not know that within those points there are horizontal point sensors and cross type sensors. The image below is what a Nikon D300, D700 or even a D3 user would see in their viewfinder when they use a 51 AF point sensor.


The 3 columns in the middle were highlighted in red because they are cross sensors while the remaining AF points are horizontal sensors. You may be wondering by now what is the difference between the two sensors.

  • Horizontal sensors – like the name suggest only utilize horizontal lines to detect contrast between the subject where you attempt to focus and the background.
  • Cross type sensors – utilizes both horizontal and vertical lines to detect the contrast between your subject and the background.
You may have already guess it by now that the cross sensor would be able to acquire a focus on your subject a lot more faster as oppose to horizontal sensors.

Useful tips and tricks

When shooting under the conditions outlined above or when you are plague with focus hunting, some of the tips below may be able to help you in achieving faster and more accurate focus:

  • Focus assist lights – is a very useful feature which comes in handy when dealing with such conditions. This option is available on all of the Nikon DSLR range except the D3. I learn this the hard way but you should not; the AF assist light would only work when your AF point is at the center and you are in single servo (AF-S) mode. Any other setting or mode and the focus assist light would not work. This also applies to SU-800, SB-600, SB-800 and SB-900 which has build in focus assist.
  • Use AF Cross type sensor – using these sensors under such conditions would greatly improve focus acquisition speed. Any trick is to hold the shutter half way and move your body back and forth this helps improve focusing speed.
  • Focus on the edge of the subject – Focusing on the edge of the subject under low light / low contrast conditions greatly increase acquisition speed. Utilize the center AF point and attempt to focus on the edge of the subject, holding the shutter half way, recompose your shot and press the shutter release button all the way.


Thursday, January 22, 2009

AF Nikkor 35mm f/2D

This little gem is one of the few lenses which lay hidden since Nikon introduced their killer trinity lens combination (14-24 - wide, 24-70 - mid, 70-200 - tele). During the film days this lens was frequently used for landscapes and street photography. Having a fixed large aperture of f/2 makes it an interesting "wide" angle lens for hand held low light photography.


I also decided to do a quick test on the Carl Zeiss 35mm f/2 since I was there. Check out the images below.


Though they are not identical in terms of distance but there were not much changes in the subject and lighting. The Zeiss is close to 3x the price of the Nikkor. I don't know if you can tell the difference between the two; but to my untrained eye my money is on the Nikkor why?

1) Value for money the Nikkor is almost 3x cheaper. Although the Zeiss has a very solid feel and built quality but would you really be willing to pay for it?

2) Half the weight of the Zeiss and almost half the size. Put that on a D3 and lugg around two bodies and you will be thinking of ways to lighten the load.

3) Auto Focus - I really can't leave without it can you?

4) If you don't pixel peep can you actually "see" the sharpness or details difference? Do you print your work at 100%?

So you still say the 35mm Zeiss is better? well then... the Zeiss would be your choice if:

1) You do a lot of pre-focus shooting
2) You like manual focus
3) You got cash to burn

As for me, this lens would replace the Nikkor 24-70mm f/2.8 which I currently use for events since I cannot afford the discontinued Nikkor 28mm f/1.4 or the Nikkor 35mm f/1.4. I will be test driving this lens in the next wedding dinner so stay tune for more updates.

Wednesday, January 21, 2009

D700 Firmware Update 1.01


The following improvements have been made in version 1.01

- When Custom Setting a4 Focus tracking with lock-on was set to Off in Continuous-servo AF, the lens drive moved gradually without achieving focus. This issue has been resolved.
- When the Speedlight SB-800 was mounted on the camera with flash mode set to Distance-priority manual (GN) mode, and then the exposure meters were reactivated or the camera was turned on, the distance information displayed on the SB-800 changed. This issue has been resolved.
- When the Multi-Power Battery Pack MB-D10 was mounted on the camera and an EN-EL3e battery inserted in the camera but no batteries inserted in the MB-D10, and SB-900 flash mode set to TTL auto flash mode, the flash mode changed to A mode when the exposure meters turned off or were reactivated, or the camera was turned off or on. This issue has been resolved. (This issue has also been resolved with SB-900 firmware Ver. 5.02.)
- An issue that, in extremely rare cases, resulted in noticeable black dots in images captured with Long exp. NR in the shooting menu set to On has been resolved.
- Manamah, displayed in the Time zone options for the World time item in the setup menu, has been changed to Manama.

D3 Firmware Update 2.01

The following improvements have been made in version 2.01

- Geodetic information is now displayed in ViewNX Ver. 1.2.0 or later and Capture NX 2 Ver. 2.1.0 or later for images captured with the GPS Unit GP-1 mounted on the camera.
- Autofocus-response performance in focus mode C (Continuous-servo AF mode) with relatively dark subjects has been increased.
- When the AF-ON button is pressed, the monitor turns off and a focus point can now be selected using the multi selector.
- Photo information displayed in full-frame playback has been modified as follows:
HI-, LO- has been changed to Hi, Lo
WARM TONE has been changed to WARM FILTER
COLOR CUSTOM has been changed to COLOR BALANCE
- Manamah, displayed in the Time zone options for the World time item in the setup menu, has been changed to Manama.
- An issue that, in extremely rare cases, resulted in noticeable black dots in images captured with Long exp. NR in the shooting menu set to On has been resolved.
- When the Speedlight SB-800 was mounted on the camera with flash mode set to Distance-priority manual (GN) mode, and then the exposure meters were reactivated or the camera was turned on, the distance information displayed on the SB-800 changed. This issue has been resolved.
- An issue that, in some rare cases, caused images captured with the following lenses to be under-exposed, has been resolved.
AF-S VR Micro-Nikkor 105mm f/2.8G IF-ED
AF VR Zoom-Nikkor 80-400mm f/4.5-5.6D ED (5.0x)

Tuesday, January 20, 2009

Fujifilm S6pro

While the world waits for the actual news from Fujifilm on the S6pro here is an interesting article for bedtime reading.

Monday, January 19, 2009

Stock Photography

Had the pleasure of conducting a class at the Nikonian Academy on stock photography to a bunch of energetic and super talented photographers.

Me taken by Andrew

Many people believe that when you teach you give something away e.g. your knowledge or your skills but the thing about giving is you ALWAYS get something back in return whether you realize it or not.

Converting the theory to practical

Saturday, January 17, 2009

Delicious through the lens of Nikkor 105mm f/2.8G IF-ED

The food was great the company was better. I shall let the lens do the talking. As usual macro lenses makes excellent product shoots. Images below were taken using Nikkor 105mm f/2.8G IF-ED.

If you like a versatile macro lens the Nikkor range would not disappoint. Although the 105mm version provides a tighter field of view as compared to the AF-S Micro Nikkor 60mm f/2.8G ED lens, you can never go wrong with either one. Superbly sharp and the colors are beautiful.

Verdict:

Macro lenses are a must have for any photographer. These lenses are so versatile, you can do macro shots, product shots, food shots and even portraiture (The sharpness is beautiful). So which one to choose. Let me help :)

60mm if you
- Are on a budget
- Don't require the working distance which the 105 offers
- Prefer a wider Field of View

105mm if you
- Not on a budget
- Need the additional working distance
- Prefer a tighter Field of View

Friday, January 16, 2009

Paddington through the lens of Nikkor 60mm f/2.8G

Went out on a date with my wife to Paddington House of Pancakes at The Curve on Christmas Eve. Decided to take the AF-S Micro Nikkor 60mm f/2.8G ED lens for a spin. Was interested to test some low light capabilities. The images below are some samples taken during the outing and I took the liberty of leaving the exif intact for the food shots. The only post processing done for the images below were levels and curves on Capture NX 2.

You’d be surprise that some of the images ISO were as high as 6400 and produce usable results with fantastic details. The 60mm on a FX makes it an interesting portrait lens while on a DX you would be getting 90mm which would give it a tighter crop. The image below was taken with the AF-S Micro Nikkor 60mm f/2.8G ED lens on a D3.

DxOMark review for the Nikon D3X

With a DxOMark Sensor score of 88 points, the Nikon D3X takes the lead of dxomark.com ranking as of January 14, 2009.

Nikon D3X definitely takes the lead within its category and will be remembered as the first camera clearly demonstrating more than 12-bit effective depth of information.

Click here for full review.

Sunday, January 11, 2009

The bigger the light source...

The bigger the light source, the softer and broader the light.

As you venture deeper into the wonderful world of photography you will start to experiment with off camera lighting. When one talks about lighting there are two types of lighting:

  • Hard lighting is where there is minimal transition between the light and dark areas also know as high contrast.
  • Soft lighting is where there is a gradual transition between the light and dark areas degree of contrast between the light and dark areas of the subject.
The image below provides an example of hard and soft lighting.


The type of light source used to light your subject would determine the quality of light (hard or soft). Just keep this in mind when choosing your light source, the bigger the light source the softer the light e.g. the sun and the smaller light source e.g. your camera pop up flash the harsher the light on your subject.

The complete article can be found here.


Sunday, January 04, 2009

Portraits are a beautiful thing

I took this portrait during a recent charity event. Portraits are a beautiful thing for both the people in it and the people that looks at it. It invokes memories of happy thoughts of the past and present. Looking back at the images of a father and son brings back memories of my father which lost his live due to cancer 3 years ago. It makes me think of how we as humans tend to take the everyday things in life for granted until we loose it. So I hope that the images below serves as a reflection to us about the beauty around us and cherish it for we will never know when we will loose it.


(Click on image for larger view)


(Click on image for larger view)

Saturday, January 03, 2009

Stopping AIDS - snapshots for support

What better way to start off the new year. There is a fund raising for a home called Rumah Ozanam, a home for women and children with HIV. Most of them have been abandoned by the familes and have no where else to go.


Datin Paduka Marina Mahathir officiating the launch


This home has been helping them by taking them in & giving them shelter, food, clothing, medication, education, etc. It costs RM4,000.00 to run this home per month and we aim to raise as much as we can for them. Thus, I urge you to come and participate in this fund raiser of ours & help us make a difference where we can.

The booth for portraits

All details of the events are in the invitation attached. There will also be activities throughout the event at Bangsar Village. The photography exhibition will be displayed from 31st December 2008. The official launch of the event is on 2nd of Jan 2009 and the closing, together with an Auction will take place on 4th of Jan 2009 so please come and support this event. Below are some of the portraits taken by me which is printed on the spot for RM19 which will go to charity.


Friday, January 02, 2009

New Year Resolution 2009

The new year means reflection on old resolutions and creating new ones. Like many I have created a list and intending to stick to it. Below is my list:

1. Spend more time in the digital darkroom. Given the fact that there are more and more photographers out there, digital darkroom is one of the means to differentiate from the pack.

2. Update this blog on a weekly basis.

3. Turn pro a.k.a full time photographer.

4. Get my mpa qualification.

5. Get rid of my "NAS".


Jeslyn by Braendan (click for larger view)

Image above was taken impromptu after Jim Liaw class in our recent Nikonian Academy Penang Photo Trip 2008.

Thursday, January 01, 2009

Happy New Year 2009

MIFC 2008

I like the rest of the world have made some resolutions. One of it is ensuring this blog gets updated on a weekly basis. So Happy New Year and do drop by "weekly" :).