Advancement in digital photography has provided us with the ability to review our images on the spot. Having said this, how many times have you noticed what is seen on the cameras LCD may not be what you see on your workstation? Image too bright or too dark perhaps?

This is where histogram comes into play. Relying on the naked eye alone can be deceiving but when you combine what you see with a basic understanding of the histogram you can be sure of getting the exposure you want.
I won’t provide a detail understanding of the histogram. My aim is to provide you with enough information to get you started and if you like to go deeper this article and this article is perfect for further reading. Shall we continue?
I won’t provide a detail understanding of the histogram. My aim is to provide you with enough information to get you started and if you like to go deeper this article and this article is perfect for further reading. Shall we continue?
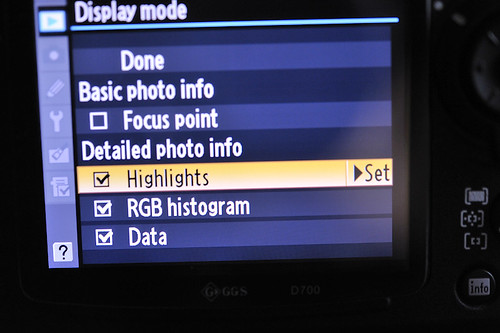
The first thing you need to do it to turn it on. Make sure you select "Highlights" as well. The "Highlights" is useful when reviewing your images from the camera. I will get to the highlights part as we progress.

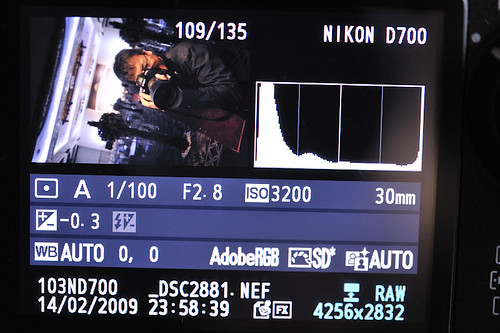
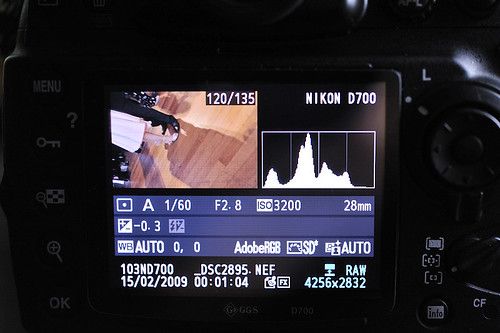
Before we start analyzing images lets have an understanding of what a histogram is. Most cameras would have something similar to what is seen above displayed when you review an image. The histogram is separated into 4 zones. That wave lines which spreads across the 4 zones represents the tonal range. There are generally 3 categories of exposure which you need to understand (overexpose, underexpose and correctly expose).
Overexposed Image - You loose details in the highlights

Underexposed Image - You loose details in the shadow
Correctly Expose Image - You have details in both the highlights and the shadow
Tips
Overexposed Image - You loose details in the highlights
If the tonal range in the histogram is heavy towards the right zone it means the image is either overexpose or the scene has a lot more lighter tones than darker tones e.g. shooting a white cloth under the sun. This is where the "highlights" selection you have made earlier comes into play. Blinking means there are no details in that area. While some blinking is inevitable too much could mean a washed out or overexposed image.
Underexposed Image - You loose details in the shadow
If the tonal range in the histogram is heavy towards the left it means the image is either underexpose or the scene has a lot more darker tone than lighter tones e.g. a groom standing next to a black car. If your image is underexpose you loose details in the shadow areas.
Correctly Expose Image - You have details in both the highlights and the shadow
A correctly expose image can very deceiving (some like it a little overexpose while others may like it a little more underexpose). It’s all about balancing the highlights and the shadows to obtain the exposure you require. With a little more understanding of your subject, the background and the foreground you will then be able to expose correctly.
Tips
As we progress we not only look at images we look at EXIF. Why not look at the histogram instead? Histogram can tell you a lot about a scene. As you analyze deeper you will begin to understand the relationship between a scene and the histogram.


No comments:
Post a Comment