Thursday, February 26, 2009

Nikon Focusing Screen Type E for D3

Nikon Type E focusing screen

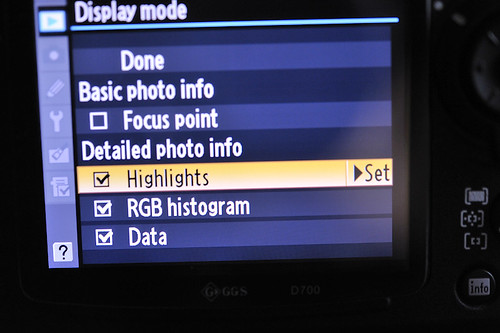
I have grown accustom to having grid lines on my focusing screen. Had that on the D300, D700 but the D3 did not provide such functionality. I viewed that as an important feature especially when composing, doing hand held panorama, architectural etc.

Since this is not a software / firmware functionality which you can just turn on or off the only way to have grid lines is to change the focusing screen. There are currently two choices in the market one from Nikon which they call Type E and the other from this company called Katz Eye. I choose Nikon because of the price and I don’t have to order it online.

After a few weeks wait for stock availability the focusing screen finally arrived. Before we proceed, let me make a few points clear.

  • Point 1 – I will not be held liable if anything goes wrong. You do this on your own risk.
  • Point 2 – Do not attempt to use any form of force. If force is required means something went wrong.
  • Point 3 – When in doubt please get someone experience to do it for you.
  • Point 4 – Wash and dry your hands before doing this.
  • Point 5 – Since you will be exposing your camera please don't do this in the open.
Step 1

Step 1 - This is the standard package. It comes with the grid line focusing screen and a clipper. I will get to that later.

Step 2

Step 2 - Before we proceed, let have a basic understanding on what to expect. In order to change the focusing screen you must first release the clip which holds the frame. You can then lift the frame gently with your fingers. Tilting the camera to a little bit and the existing standard focusing screen should come out. See above.

Step 3

Step 3 - Now that you have understood the steps involve lets begin. Using your fingernails gently release the clip following the direction of the arrows. Remember do not use force.

Step 4

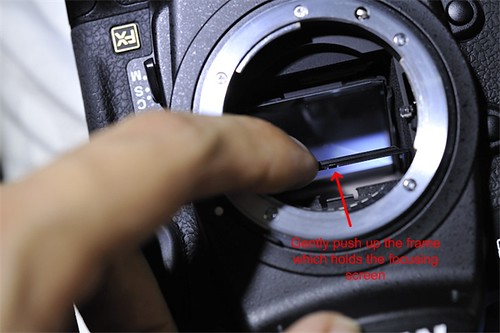
Step 4 - Gently push the frame up. Now all you need to do is tilt your camera towards the direction of the arrow to dislodge the focusing screen which is underneath the frame.

Step 5

Step 5 - Gently remove the existing focusing screen either with your fingers or with the clip provided. Take note of that edge. Make sure when you replace with the new one the edge goes in the same way.

Step 6

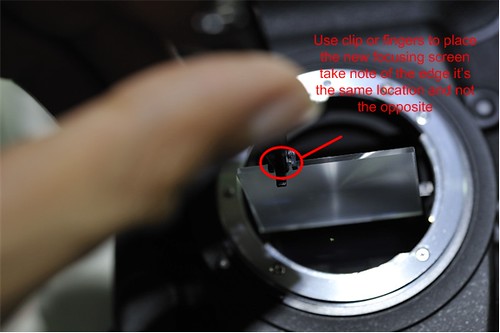
Step 6 - Gently put in the new focusing screen. Once its in tilt it again and it should lodge itself right into place. Gently push the frame back down and ensure its properly lock. Please do not use force.
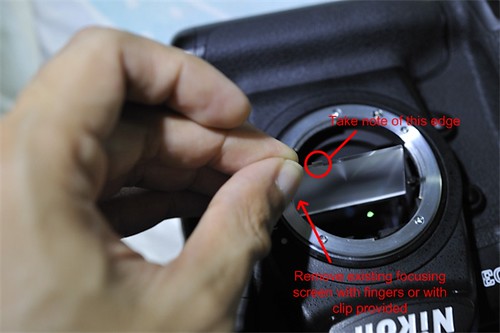
Step 7 - Mission completed. Mount your lens and you are back into action.


Nikon D Town


Nikon DTOWN is a weekly show brought to you by Scott Kelby and Matt Kloskowski with KelbyTraining.com. This site is a venue where Scott and Matt share their photography knowledge along with the coolest tips and tricks out there for Nikon’s digital SLR cameras.

Wednesday, February 25, 2009

Olympus E-620 Worlds Smallest & Lightest DSLR


No news on Olympus Micro 4/3rd Camera Release but this is interesting. Olympus introduced the E-620, which is positioned as the worlds smallest and lightest DSLR. Apart from its size and weight some notable features worth mentioning would be the upgraded AF system and the swivel LCD. You can find more information from Olympus website here.

Friday, February 20, 2009

Ricoh CX1 feautres in camera HDR

I was shocked when I read this especially when such a feature is available on a compact camera. Ricoh recently unveiled CX1 Compact Camera featuring a CMOS sensor with a twist. The CX1 comes with Dynamic Range Double Shot Mode which shoots two still images of different exposures and combines the properly exposed portions of each image. The outcome should be similar to HDR images. Apart from that this baby is capable of shooting at ultra high spees of 120 frames / sec.

Press Release Here.

Specifications Here.

Thursday, February 19, 2009

Histogram 101

Advancement in digital photography has provided us with the ability to review our images on the spot. Having said this, how many times have you noticed what is seen on the cameras LCD may not be what you see on your workstation? Image too bright or too dark perhaps?


This is where histogram comes into play. Relying on the naked eye alone can be deceiving but when you combine what you see with a basic understanding of the histogram you can be sure of getting the exposure you want.

I won’t provide a detail understanding of the histogram. My aim is to provide you with enough information to get you started and if you like to go deeper this article and this article is perfect for further reading. Shall we continue?


The first thing you need to do it to turn it on. Make sure you select "Highlights" as well. The "Highlights" is useful when reviewing your images from the camera. I will get to the highlights part as we progress.


Before we start analyzing images lets have an understanding of what a histogram is. Most cameras would have something similar to what is seen above displayed when you review an image. The histogram is separated into 4 zones. That wave lines which spreads across the 4 zones represents the tonal range. There are generally 3 categories of exposure which you need to understand (overexpose, underexpose and correctly expose).

Overexposed Image - You loose details in the highlights


If the tonal range in the histogram is heavy towards the right zone it means the image is either overexpose or the scene has a lot more lighter tones than darker tones e.g. shooting a white cloth under the sun. This is where the "highlights" selection you have made earlier comes into play. Blinking means there are no details in that area. While some blinking is inevitable too much could mean a washed out or overexposed image.

Underexposed Image - You loose details in the shadow


If the tonal range in the histogram is heavy towards the left it means the image is either underexpose or the scene has a lot more darker tone than lighter tones e.g. a groom standing next to a black car. If your image is underexpose you loose details in the shadow areas.

Correctly Expose Image - You have details in both the highlights and the shadow


A correctly expose image can very deceiving (some like it a little overexpose while others may like it a little more underexpose). It’s all about balancing the highlights and the shadows to obtain the exposure you require. With a little more understanding of your subject, the background and the foreground you will then be able to expose correctly.

Tips

As we progress we not only look at images we look at EXIF. Why not look at the histogram instead? Histogram can tell you a lot about a scene. As you analyze deeper you will begin to understand the relationship between a scene and the histogram.

Sunday, February 15, 2009

Happy Valentine Day 2009


Had a busy week so this is a little belated. The rose has always been valued for its beauty and has a long history of symbolism. The pink rose connotes grace and gentility. Wishing you and your loved ones a Happy Valentine Day.

More DX Lenses: Nikkor AF-S 10-18mm f/4G

[Update] Looks like this will remain a rumor. Wished Nikon created a real ultra wide angle lens for Nikon DX. I am still keeping my fingers cross.

The new ultra wide angle from Nikon. Base on the recent interview with Nikon they did mention that there will be more DX lens to be released in the coming months and this baby seems to fit the requirements as there is no real ultra wide angle on the DX by Nikkor. It would be interesting to see how this lens fair against the Sigma 10-20 and the Tokina 11-16.

Whether this is a DX only lens or is applicable for both platforms the mystery remains. Regardless of which platform it supports it will be interesting and enforces Nikon position in the ultra wide angle category.

Thursday, February 12, 2009

Nikon Prices up 10% - 15%

Well looks like its true, Nikon price increase on a global scale has now reached Malaysia. Prices for Nikon related items have been increase between 10% - 15% to mitigate the appreciation of the Yen. *Sigh* and we were hoping price would come down.

Wednesday, February 11, 2009

Strawberry Milk 101

There is nothing else more rewarding than shooting strawberries falling into artificial milk with your loved ones on a weekend. What more can you ask for hehe. Anyways for those of you which are interested in producing such shots well there is no better time than to try it now. Check this link out.
Some Pointers:

1. The white is not milk. Milk will never be this white. The trick is to use coffee creamer mixed with water. The more creamer you put the more white it becomes.

2. Always wash the strawberries before attempting to drop it into the milk again if you don't you can see the "milk" on the top of the strawberry which is not pleasing.

3. Use a fast shutter speed e.g. 250 to freeze the movement.

4. If you are hand holding the camera like what I was doing place one eye in the viewfinder while the other is on your wife hands. As the strawberry you see the strawberry dropping that is when you press the shutter. Some trial and error would make it easier.

5. Always pre-focus your shots. 51 point 3D tracking does not work here hehe too short too fast.

6. Do it with someone it more fun that way. At least you have someone to share the moment with.

Tuesday, February 10, 2009

More DX lenses in 2009?

Check this article, its an interview with Nikon. Some statement taken from this article I find very interesting.

1. "The main target is D40/D60/D90 owners. They make up 80% of our DSLR sales and there wasn't really an inexpensive prime lens for them. So far, the lens offering for that market has included some really good zooms, but this offers them something they were missing."

2. "DX is not over," Drean says: "we plan to increase the offering. The prime lenses were definitely something that was missing."

3. "If even 5% of the D40, D50, D60, D80, D90 owners buy this lens, that's a huge number," and, he adds: "this is not the last lens announcement we'll be making this year."

Since we are humans and some of you like me are gear heads, so I am going to speculate (please take it with a grain of salt):

1. No more FX lens in 2009 - Given the current economic condition it does not make business sense for Nikon to invest in releasing or renewing new FX lens as they will release lens for the masses imagine 5% of 80% buying the new lens as oppose to 5% of the 20% FX market.

2. New DX Body - A new DX body possibly called D400 to replace the D300 looks promising.

3. New DX Zoom - Possibly fix aperture DX zoom lenses.

Well only time will tell.

TTL: Nikon AF-S TC-14EII 1.4x Teleconverter


Since you click on this link you may already know what a teleconverter is. If you don't please click here. I also found a good article on the pros and cons of using teleconverters which you should look at before investing on one. Now lets get on with business. Like many I am a Nikon user and like many I have invested on AF-S VR Zoom-Nikkor 70-200mm f/2.8G IF-ED and found at times wishing I had a longer reach hence the search for a teleconverter to pair with it.


After countless of googling and reading I have decided to go with the above because it produces the least image degradation (softness, color contrast, CA etc.). The question you would then be asking is whether I am satisfied with it? and the answer would be yes. Check out the pictures they are all taken with a D300 + 70-200 + TC-14EII and tell me what you think.


Monday, February 09, 2009

AF-S DX NIKKOR 35mm f/1.8G


Well looks like Nikon made it official today but too bad its only on DX. You can obtain the specs from Nikon website. So how will this impact us?

Point 1 - DX is here to stay since the D400 is rumored to be announced during Photokina 2009. What happens when they reach D600? maybe it will end there? who knows.

Point 2 - The DX crop factor would make this lens a 50mm lens and it should also be cheaper than the current 35mm f/2 lens since it should be cheaper to make DX lenses than FX ones.

Point 3 - Given the current market conditions Nikon may place more emphasis on DX segment because of costs and a larger target audience. This could also mean less focus on renewing FX primes.

HDR 101

(Photomatix HDR with 5 Exposures)

High dynamic range imaging or HDR is a type of technique employed by photographers to ensure a greater dynamic range (details in the light and dark areas are nicely exposed) within their images. Such technique is used mainly in scenes where there are extreme contrast between the light and dark areas. Introductions aside, there are mainly 3 methods for HDR, Method 1 would needs to be done on location while Method 2 and 3 involves post processing in the digital darkroom.

Method 1 – Multiple Exposure Bracketing

(Photomatix HDR with 5 Exposures)

Bracketing is where you take different exposures of the same scene. The number of exposure can range from 2 to or more depending on the photographer preferences. A combination of sturdy tripod, shutter release with mirror up mode is recommended to ensure sharp images. The typical workflow for Method 1 would be:

Step 1 – Take different exposure of the scene. Please check your camera user manual for exposure bracketing

Step 2 – If you shoot RAW, you will need to convert those files to jpeg. Do not apply any adjustments to it as it may impact the outcome of the image.

Step 3 – Import the jpeg files into a HDR program like Photomatix

Step 4 – Follow the step by step guide of the program and you’re done.

Method 2 – Single RAW file

(Photomatix HDR with Single .NEF)

This method is suitable when you want to take HDR of a scene but that scene has a lot of moving objects or subjects.

Step 1 – Take your shot. Ensure it is properly exposed. Use the histogram as a guide.

Step 2 – If you use Photomatix you can actually just import the RAW file into it and follow the instructions on the screen.

Step 3 – If you are not planning to use Step 2 you can actually use any RAW program to create multiple exposure from a single raw file.

Andre Gunther created a detailed step by step guide. You can check it out here.

Method 3 – Single jpeg file with Dynamic HDR

(Panorama 3 jpegs hand held with Dyamic HDR)

If method 2 was not cheating enough this would be the king of all hehe. Anyways I see this as a very useful addition to your post processing arsenal. You will never know when you might need it. I personally found this to be a life saver on days when you forget to change your settings or when you don’t have time to properly meter a scene.

(Single jpeg with Dyamic HDR)

Step 1 – Take a shot of the scene. Proper exposure is of course preferred. But that don’t always happen in real life e.g. when your wife is nagging at you for bringing the camera along or when you only got one shot and you forgot to use RAW.

Step 2 – You can download the software and follow the step by step guide here.

Sunday, February 08, 2009

Black & White 101

Original Image (HDR 5 Exposures)

Colors are one of the most important aspects in photography. Different choice of colors conveys a different message to a viewer. Which works best is entirely up to the photographer and as for the viewer well beauty is in the eyes of the beholder.

Conversion using Photoshop CS3 Grey scale Only

Conversion using Black & White Conversion Techniques

One of the more popular color treatments which had stood the test of time would be black & white. I have provided some links below on the Black & White conversion which you can experiment with.

External Links:
1. Photoshop Support - Turning Photos From Color to Stunning Black and White
2. ePhotozine - Black & White High Key Effects in Photoshop
3. Outdoor Eyes -
Black & White Adobe Photoshop Conversion Techniques

So don't forget to experiment with different color treatments and be careful when applying them as they tend to make images look flat when not done appropriately. As you progress you would then know what you want even before you press the shutter.

Wednesday, February 04, 2009

D3X in comparison with Medium Format

DxOMark has recently compiled data on some of the industry leading medium format cameras. With this data in place we can make comparison against the D3X to see how it faired. Have a look at the comparison below:

Click on image for link

Its interesting to see those technical results don't you think so? How does it actually relate to the real world would be another thing all together.

Non-warranty DSLR CCD Cleaning Charge

Nikon Malaysia: Non-warranty DSLR CCD Cleaning Charge

Latest announcement from Nikon Malaysia.

*1). Pro-series – Price of service is RM80.00 per set.

Models includes :-

D1, D1x, D1H, D2x, D2xs, D2H, D2Hs, D3, D3x, D700.

*2). Medium series – Price of service is RM60.00 per set.

Models includes :-

D40, D40x, D50, D60, D70, D70s, D80, D90, D100, D200, D300.

Tuesday, February 03, 2009

Ringlight 101

What do you get when lord of the rings meet star wars?


Rings + Light = Ringlights. Sorry another one of my attempts at making jokes. Anyways lets get down to business. For those of you who have not heard ringlights are one of the most overly used tools in the fashion / commercial photography industry.


A ringflash or ringlight is a circular donut like tube thing which emits light. It is normally positioned in the front on axis with the camera view. When used alone the ringlight / flash would create a unique 3D halo effect on your subject. Jill greenberg and a few other noted fashion / commercial photographer tends to use ringlights / flash in conjunction with side / rim lights to create that look (Jill greenberg / Dave hill type of look).


P/S: When used in conjunction with backlights or key lights the ringlight / flash becomes an effective fill light.

Monday, February 02, 2009

Fujifilm s8000fd

Fujifilm s8000fd introduced in 2007 is one of the early "big zoom" cameras with 18x. The recent ones hover around the 24x range. Some of you may be wondering what can a point and shoot camera do?

Switch to macro mode with maximum zoom range you can create image like this.

So the moral of the story is if you are lazy to lug around a DSLR with a zoom lens you may want to consider one of these.