Showing posts with label microstock. Show all posts

Saturday, July 25, 2009

10# Microstock Series - Subject Isolation


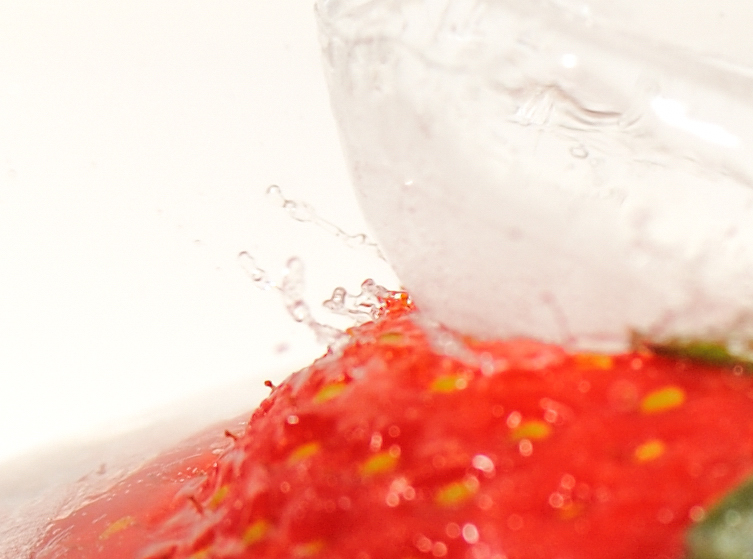
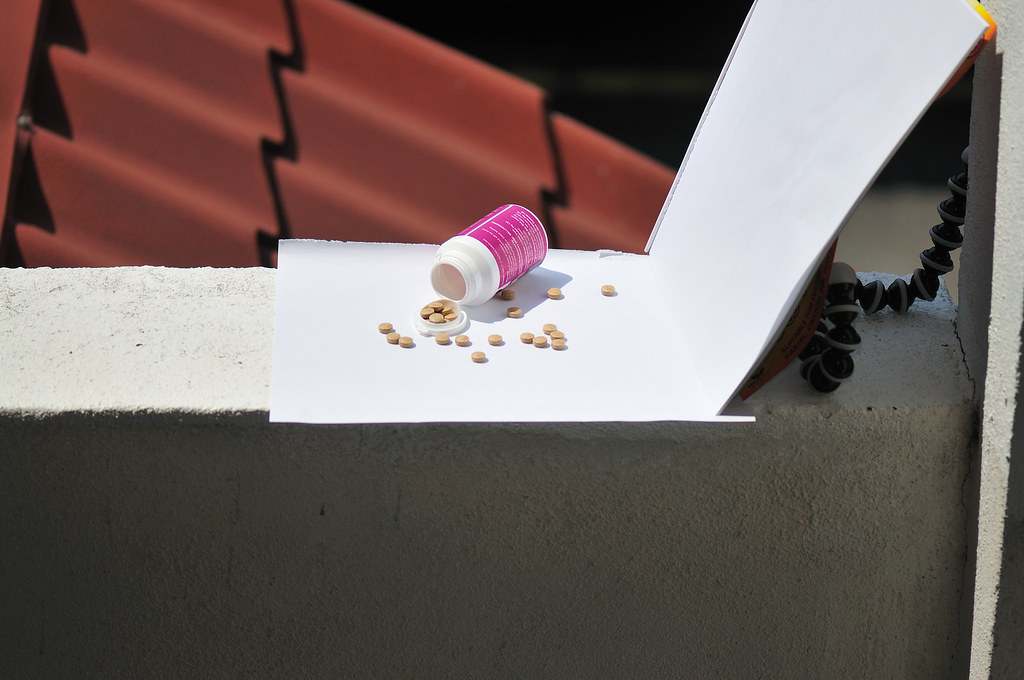
I thought I share with you something that happen to me recently. The image above was submitted to Dreamstime and got rejected. So I wrote in to inquire as to why it was rejected. The answer I got would change the way I look subjects isolated against a white background for Microstock. Call me naive but if you were like me you would be interested in this:

"Although you might have intended the shadow to add some dramatic look to the image, we don't feel it has a sales potential. Images isolated on white background almost always end up as design elements, for further processing. Shadows don't help here much - if needed, they are easily added, but removing them is much more time consuming."

Ok for those who missed the point here is what it means "Images isolated on white background almost always end up as design elements, for further processing....." I was like ^&%^&%*& I wish someone told me this earlier hehe. Anyways hope you don't run into a brick wall the same way I did. Happy shooting and happy selling.

Tuesday, June 02, 2009

Rhea Lim

_DSC7885-Edit-Edit_1119_.JPG
My personal Fave =)

We had a productive weekend. Its a little bit different from the portraiture work which I am used to. Since I am shooting for commercial stock photography I am limited by my ISO range and had to use flash as oppose to natural lighting which I had been accustom too. Anyways had a lot of good commercial worthy shots.

_DSC8217-Edit-2_1117_.JPG

_DSC8201-Edit-2_1116_.JPG

_DSC8175_1115_.JPG

_DSC8024-Edit_1113_.JPG

_DSC8080-Edit_1114_.JPG

Tuesday, April 14, 2009

Muffins

_DSC4338_729_.JPG

Ever looked at food magazines and wondered how they produce such amazing food shots? Its easier than you think. Today I am going to show how I produce the above image. I took a shot of the entire setup to aid the explanation process.

_DSC5233_730_.JPG

All you really need is to get your creative juices moving, practice some patience, a window with lights (excellent fill light) and last but not least a main light e.g. off camera flash, flashlight or even like what you see in this scene a video light is used as the main light.

Some of you may have more questions than before so here are some which I could think of:

Q: Whats all this talk about main light fill light. Its driving me nuts.

A: Consider main light as your PRIMARY light source while fill light is your SECONDARY light source. The main light will shape your subject, bring out the features, textures etc depending on what you shoot. The muffin above for example, the textures on the muffin would have been lost without a main light. While the secondary light source complements the entire scene softening shadows etc.

Q: Why did you position the light that way? and why is that image shot against the light source?

A: It's position that way so the it brings out the texture of the muffin since that is my main subject. Too low or too high and I would have lost the details on the muffin. General rule of thumb is to place the light source at a 45 degree angle but do take note of the subject and also what you want to achieve.

I personally find shooting in perpendicular against the light creates a more pleasing image. Its not wrong to shoot in the same direction as the light, I personally don't find it interesting.

Q: Why did you use a yellow light source?

A: Food tends to look nicer under yellow light don't you agree?. Haven't you noticed restaurants tend to use yellow light a LOT?

Sunday, March 29, 2009

Freezing Motion

Red chillies 4
© Photographer: Braendan | Agency: Dreamstime.com

Freezing motion is easy, all you need is to keep your shutter speed between 125 - 250 when you are using off camera flash and if you are using natural light ensure you are using shutter speed 250 and above depending on the speed of your subject. The rule of thumb is the faster your shutter speed the better it gets at freezing motion.

I normally shoot in manual mode which gives me more control over the end image result. Using manual mode is easier than you think. Below is a 3 step proceed which I use when I am using manual mode for studio shots:

Red chillies 3

© Photographer: Braendan | Agency: Dreamstime.com
  • First Determine the Aperture - Before I press the shutter I already have a conceptual idea on the depth of field which I require on a particular subject matter. Take the above subject for example, where I needed to ensure the entire subject is in focus hence I used a smaller aperture e.g. f/11
  • Secondly Determine the Shutter Speed - When it comes to using off camera flash such as shots above my shutter speed would range between 125 - 250 where 250 is the maximum sync speed between your shutter and your off camera flash.
  • Thirdly the ISO - For studio shots the ISO would normally not exceed 200. I notice even for FX if you using anything above ISO 200 when some post processing is applied to the images you may notice noise in the dark areas which is a no no for microstock. So try to keep it at ISO 200 or below.
  • Lastly the Flash output - Not everyone runs around with a light meter so follow the above steps first then adjust your flash output till you have achieved the desired results.


Tips 1: When shooting outdoors or natural light set your ISO first then your aperture then change your shutter speed to achieve the desired exposure. Remember this:
  • Aperture - Used to separate your subject from the background and foreground. So the smaller your aperture number (f/1.4 - f/4) the more blurred your background and foreground would be.
  • Shutter Speed - Use to demonstrate or freeze motion. The faster the shutter speed the better it is at freezing motion. Use 125 - 250 when you have off camera lighting and 250 and above when you use natural lighting.
  • ISO - Your cameras sensitivity to light. The higher the ISO e.g. 1000 - 6400 the more sensitive it is to light which is useful when shooting under low light condition without flash. However high ISO does also increase noise in your images which can be undesirable depending on what your want.

Friday, March 27, 2009

Dreamstime Image for pjonline.com


Among 1500 images sold via Dreamstime on the net till date I manage to find this on google. It's being use for an article on pjonline.com. It's kind of cool to see your images being used commercially on an international level. I truely believe that only microstock agencies would be able to provide average joe photographers like me with such exposure.

Thursday, March 26, 2009

Breaking the illusive USD 200 a month barrier


I finally manage to break the USD 200 a month barrier. I had two close encounter in October and February all near misses. But the sales this month were better than expected. The next big question is whether I will be able to maintain it consistently for the coming months.

Monday, March 23, 2009

9# Microstock Series - Keywords


Apart from the creative barriers of photography a Microstock photographer has to also face another barrier...the dreaded Key wording process. The correct keywords could mean a sale or just another image that the buyer could not find.

So how could you possibly think of all the keyword combination? it's easy. Just follow these simple steps:
  1. Category - where does your image fit.
  2. Once you have that think of a few keywords which you feel represents that image. The more keywords the better but I tend to get stuck at around 5 keywords. Can't even get one? Don't fret, you can use the key word from the category itself.
  3. Once you have the keywords run them through a thesaurus which in turn produces loads of other keywords.
  4. Select which best represents your images and submit!

Saturday, March 21, 2009

8# Microstock Series - Body Parts

Jumping

© Photographer: Braendan | Agency: Dreamstime.com

Not sure about other Microstock sites but body parts seem to do well on Dreamstime and the best part is they do not require model release. So what are you waiting for get your family members involve in the process it not only helps you make money it brings you closer as a family.


Happy Feet II
© Photographer: Braendan | Agency: Dreamstime.com

Friday, March 20, 2009

7# Microstock Series - Models

Post-it notes
© Photographer: Braendan | Agency: Dreamstime.com

Where do you get models which will allow you to sell their images online for a low cost? The models are called family. I "use" my family as often as I can whenever possible. If you don't use them who will right? So what are you waiting for, you cannot build an online microstock portfolio and expect it to do well without even attempting to include the human element into it right?


Foot Reflexology Series 2
© Photographer: Braendan | Agency: Dreamstime.com

Thursday, March 19, 2009

6# Microstock Series - Find your images


Since I started selling images online, I tend to wonder from time to time who uses it or even how its used. Well, there are few ways to locate your images in the world wide web. You can search for it using keywords e.g. "Braendan Dreamstime" or you can try using TinEye.

TinEye is a reverse image search engine. You can submit an image to TinEye to find out where it came from, how it is being used, if modified versions of the image exist, or to find higher resolution versions. TinEye is the first image search engine on the web to use image identification technology rather than keywords, metadata or watermarks.

It sounds promising, though my image searches have not been successful maybe you will have better luck. Although not perfect it is another avenue for you to find your images online. BTW registration is required but its free.

Tuesday, March 17, 2009

5# Microstock Series - Naming Convention


Thought I let you in on a little secret. When it comes to naming conventions a.k.a the name of your image also known as your image title, I like to put it in a series e.g. Zen Series 1, Zen Series 2, Zen Series 3 etc etc. You may be thinking what the hell, should we not make the image name more meaningful by providing different images with unique and meaningful names? Have a look at the images on the top and below do you notice something? check out the dates...

Still don't see it? Okay it's simple, some buyers tend to buy or source for images in bulk, they may be looking for a similar theme or colored images so if a buyer is interested in one of your image e.g. Zen Series 2, by looking at the title he / she knows that you have more than one of such image in a similar layout or theme this will make life easier for him / her and will automatically browse through the rest of the series to see if any interest them.

If you still don't get it just remember that when you submit your images try to group them in a series or collection this will make life easy for bulk purchases which translates to more sales for you!

BTW: If you find the information in this site useful please help me by visiting the sponsors of this site.

Saturday, March 14, 2009

4# Microstock Series - Image Orientation

Behind Bars I
© Photographer: Braendan | Agency: Dreamstime.com

Some microstock photographers have suggested that you only submit one version of your image and that way you will maximize the sale value of your image. I tend to disagree to a certain extent. When a buyer searches for a potential image they may already have a certain preference in mind concerning image orientation e.g. it must be in a landscape format. If the buyer likes your image but it does not comply to that orientation he / she may forgo your image for another one and you end up loosing that sale. The bulk of my images tend to come in both landscape and portrait orientation to maximize the opportunity of a sale.


Behind Bars 2
© Photographer: Braendan | Agency: Dreamstime.com

BTW: If you find the information in this site useful please help me by visiting the sponsors of this site.

Friday, March 13, 2009

3# Microstock Series - Nikon Creative Lighting System (CLS)

Loose Weight 2

© Photographer: Braendan | Agency: Dreamstime.com

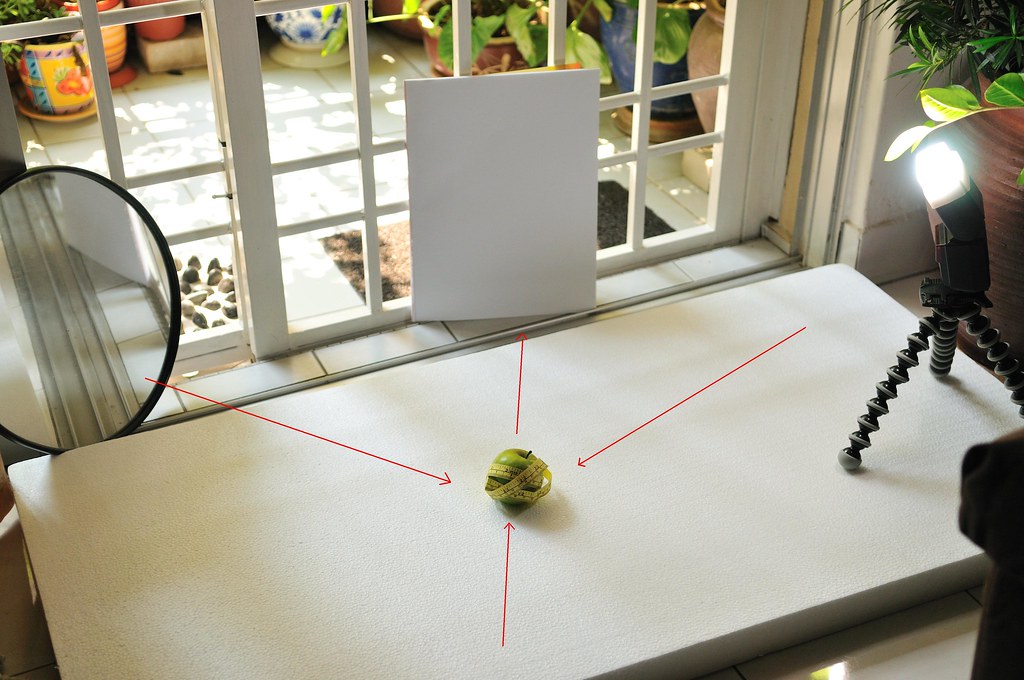
Off camera lighting is important to produce studio quality images. Such lighting will not cost you an arm and a leg in fact all you need is to think out of the box and be a little creative with what you have. Take the above image and the one below for example. If you don't look at the setup below can you guess the type of setup for this type of scene? It's actually simpler than you think.

Weight Loss in a Cup II

© Photographer: Braendan | Agency: Dreamstime.com


With the setup above you have 4 different light source which can leverage upon; the SB600, the mirror is a very good reflector, the soft light from the balcony and from your camera fill light. Everything mentioned here is already available to you if you don't have a flash don't worry just use a florescent table lamp to replace the flash.

Tip 1: Pop up flash as CLS will contribute to the lights in your photography even in "--".You notice the light on the apple on the first image? the light coming from the front is a bit harsh and its one of the drawbacks of using Nikon built in flash as a CLS commander to trigger the SB600. Although the built in flash was set to "--" it still contributes to the scene. This happens when your camera is close enough to the subject e.g. 1 feet. or closer To counter this drawback you either get an SU-800 or the inexpensive SG-31R panel which will look something like the one below.

Tip 2: When you use a light meter you should use radio trigger or SU-800. This is because of the pre-flashes before the actual flash fires. You will never be able to get a correct exposure on your light meter. If you use Built-in flash, SB-800 or even SB-900 for CLS your light meter will go crazy.

P/S: My flickr site has notes on the setup you can have a look at it here.

BTW: If you find the information in this site useful please help me by visiting the sponsors of this site.

Thursday, March 12, 2009

2# Microstock Series - File Format


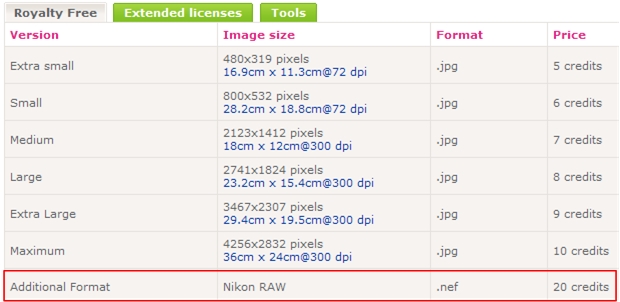
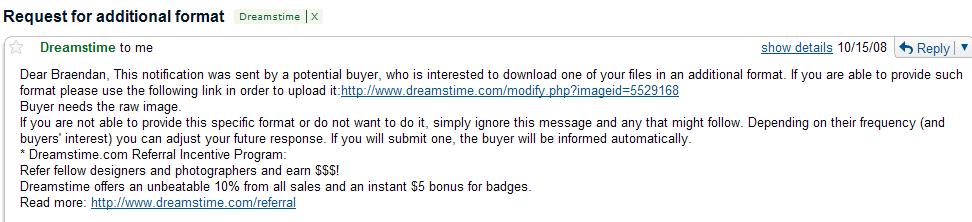
The debate on what format to shoot has been going on since they added the word digital to SLR. When it comes to Microstock well we will let you decide. Have a look at the screen shot above. Notice that red box? When you upload additional format e.g. RAW it will cost the buyer 20 credits if they decide to purchase. So what say you? Don't say it won't happen cause it did to me have a look at the email snippet below and guess what? I did not have a RAW version of that image.


Tips: My typical workflow for Dreamstime would be Shoot raw > edit in capture NX > export to jpeg >upload for approval > upon approval upload the RAW.

Wednesday, March 11, 2009

1# Microstock Series - The Sun

Diet Pills
© Photographer: Braendan | Agency: Dreamstime.com

Not many of us are equip with multiple flashgun and sometimes we just have to be creative. The shot above have been done with just one light the Sun. Microstock photography places strong emphasis on commercial value and if you want to do well you need to learn to light properly. This "Microstock Series" represents the first of many more to come with an objective of showing you behind the scenes on how the setup was done and an explanation on the lighting used. No sepcial studio setup required, all my "studio" shots for Dreamstime are done at home so with some insights you should be able to achieve the same results if not better.


Tips: I tend to rely a lot on this type of lighting because I can "see" the light it helps me see where the shadow falls and how to compose the shot. This is a lot more easier to work than flashguns as flashes involves proper lighting ratios and seeing the light with test shots on a 3" LCD. Since the sun is free and provides the best source of light use it as often as possible.

P/S: That white piece of paper is art block which is available from most stationary shops.

Tuesday, March 10, 2009

Microstock 101


As a follow-up on my recent post about Microstock, my future blog posting would be centered around my work for Dreamstime. You will get to see more of behind the scene guerrilla style home studio setup working with gears most budding starting photographers would have.

As you can see from the above, I am fairly new to the Microstock scene but when it comes to earnings the sky is the limit so with hard work, planning and dedication you will soon be earning a lot more than this!

Monday, March 09, 2009

Microstock Photography

Microstock Photography as the name suggest is a spin off from the traditional Stock Photography. One of the benefits of Microstock photography is the doors and opportunities that it opens for the average photographer.

If you want to improve as a photographer and earn money to help supplement an expensive hobby, this is one avenue to go into. Microsoft photography is one of the best residual income opportunity a photographer can get. I for one have benefited greatly by submitting to microstock agencies,with specific reference to Dreamstime where I am an exclusive contributor. While the evaluation criteria differ from agency to agency, the standards of image offered by the agencies remain.

Some of the ways which I have benefited by submitting:

1. Money - though not alot it does help motivate you to do more. With 1051 images online for a period of 1+ year I have made a total of USD 2420.

2. Critique - Your own eyes will deceive you and even your friends, but Dreamstime have become my greatest critique. Honest and constructive opinions which you rarely find elsewhere.

3. Knowledge - You learn about composition, lighting, commercial value, planning and even conceptualizing your shots as oppose to blindly taking a shot. It makes you aware.

4. Post processing - The more you submit the more you see and understand white balance, contract and even colors.